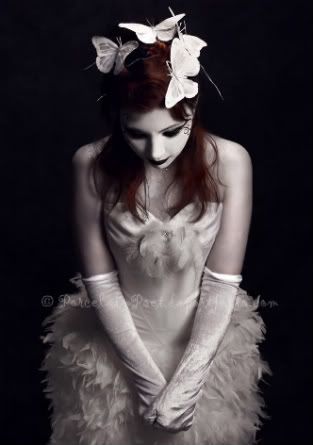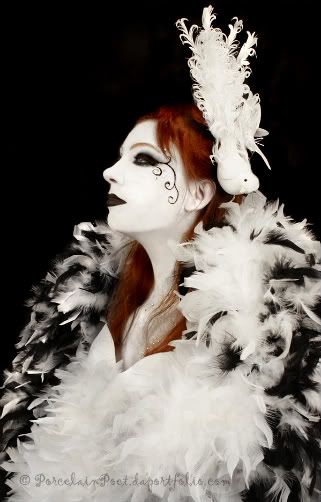

I'm finally posting here again after much encouragement from others to start writing about my shoots. Here's my Butterfly, Bird shoot... because it's weird and I don't know what to call it!
A little bit of introduction....
This was a spontaneous, last minute shoot which we threw together. I worked with 2 of my best friends, Candy and Sara. Candy was the willing model. She hasn't done much modeling but I encouraged her to look into it more if she's interested because she impressed me with her patience and ability to take direction (2 important characteristics you need if you want to model). So perhaps we'll be seeing her on ModelMayhem in the near future. Sara who already has great taste in clothing and talent at doing makeup, acted as the makeup artist, stylist and general assistant. She also gave Candy some great direction during the shoot (because I zone out when I'm taking photos and forget to give direction sometimes). Sara sort of came up with the makeup on her own, with a little bit of suggestion from me (white face, black eyes and lips). We wanted it to sort of match the dress and look bird like. The butterflies in the hair were just random and we thought they looked neat. =P
For this shoot, it was all inspired by the dress seen in the photos. The dress was created by Victoria of Victoria's Bridal (I have yet to meet her, but she's a friend of Sara). Victoria saw some of my work and was kind enough to let us borrow some of her dresses. She creates custom designs and not so average wedding gowns. I knew as soon as my friend Sara showed the feathery dress to me I had to use it for something. So Sara and I went on a trip to Michael's craft store and picked up some feathers, butterflies and other fluffy, glittery cutesy things. And Sara had a seizure of excitement over everything in the store which was glittery. :)
We had a lot of fun and I realized it's quite rewarding to get to work with close friends on a shoot because it's so much more relaxed. With friends I don't have to worry about awkward silences or trying to appear more professional (of course I want to make a good impression when working with newcomers). I think this is the true meaning of "personal project" and that's exactly what I've told myself I'm going to do more of for now on.
Here are some behind the scenes shots (no editing):

Snap shot of what the bathroom counter looked like while Sara was doing makeup.


Yes, Sara is wearing a red wig. Why? Because she can.

Candy after the makeup was finished

Test Shot!

Candy and I after the shoot. I make stupid faces.

Sara and Candy after the shoot.
If anyone has any questions, feel free to ask. :)


Jessica, I love these!
ReplyDeleteAwesome to see some behind the scenes shots!
ReplyDeleteIt's great to read and see the creative process that goes into your work. The finished photo of Candy gives me the impression of a porcelain doll, a fitting restart for the Porcelain Poet's return here to Blogger.
ReplyDeleteThese are gorgeous! I love the first one especially.
ReplyDeleteYou know, Jessica, you can upload your pictures directly to blogger instead of through Photobucket. The blog will host them for you through Picasa. :)
I'm curious as to how you do your watermarks. Is it just text applied through an image editing program or is there a fancy way to make them? I've never figured out how to make mine look nice...
ReplyDeleteThank you everyone for the comments and feedback! :) If there's an easier/more appropriate way to respond to people... I haven't figured it out yet, because there's no "reply" button. So let me know if I'm doing it wrong.. lol
ReplyDelete@ Elizabeth,
Thank you! I did actually try using the blogger uploader but for some reason it wasn't working and would only let me upload one photo. I tried reloading firefox too, but it still wouldn't work for me. So I just resorted to Photobucket. I think it's a glitch that comes and goes or something. Do you ever have that problem?
@ Ramen BeSharp,
I use Photo Shop to apply the watermarks, which is fairly easy. You just use the text feature (it looks like a "T") and then you apply it as a new layer over the photo (which it will do automatically when you have the photo opened in PS). Then you select your font (the only thing about using PS for watermarks, is you don't have as many font options as if you made your watermark with a more advanced program). You can also change the color you want it to be, so lately if the photo contains a lot of blue for example, I like to make the watermark blue too. And you can change the opacity, so I like to bring it down so that the watermark is transparent and doesn't stand out very much, in order to avoid it ruining an image. I've never done anything fancy with my watermarks. Just always used Photo Shop. ;)
Hmmm, okay. Thanks! :D
ReplyDeleteI saw the first photo on dA and *loved* it... ♥
ReplyDeleteWhat can I say about discovering these behind-the-scenes shots on your blog? Love 'em, too! :-)
Nice to see new work by you.
I just love your ideas!
ReplyDeleteYour friend should do more shoots with you :D